Arduino Camera Trap
Some years ago, I had the opportunity to create a camera trap based on an Arduino board. The goal of this project was to capture photos of wild animals, and to have fun with electronics and programming.
At the time, I created a website in html, to present the project; but I can’t find the source code anymore… That’s a shame.
I will try to present this old project again, hoping that it may interest someone.
Principle
A commercial automatic camera is usually based on a heat sensor (infrared sensor), and takes pictures when it detects movement.
These sensors are similar to the presence detectors that can be found in public toilets, for example.
The project consists simply in using an infrared motion detector (PIR sensor) to trigger the shooting, performed by a digital camera.
The interface between the camera and the sensor is the Arduino board (in my case an Arduino UNO).
Hardware
- Arduino UNO (or other programmable board, with inputs / outputs)
- Infrared sensor (PIR sensor)
- Spy Camera (here an AdaFruit Spy Camera) with slot for SD card, and connectors for the trigger and the power supply
- SD card
- RTC shield for Arduino (optional but useful to record the date and time of the shots)
Assembly
The assembly is very simple. The PIR sensor output is connected on the pin 3 of the Arduino board, where the VCC (+5V) et GND (ground) are also connected to the board.
The camera trigger is connected to the pin 4 of the Arduino board, and both the VCC and GND are connected to the board as well.
We can use a 9V battery to power the Arduino board, and the camera, with an adapter. (This way, the system can be autonomous for some hours).
Warning, it is important not to connnect the spy cammera to the computer when it’s powered by the Arduino; else it will burn… (I made this mistake, and I had to buy a new camera).

Code
The code is rather simple. In the loop function, we check the state of the PIR sensor, and if it is HIGH, we trigger the camera.
We also save the date and time of shooting in the RTC shield SD card.
/*
 * piege_photographique.ino
 * Take a photo when motion is detected
 * and record the date of shooting on SD card
 * Samuel ORTION feb2019
 */

#include <SPI.h>
#include <SD.h>
#include <Wire.h> //required for the next library
#include "RTClib.h"

File myFile;
RTC_Millis rtc;

//declare the pins of the compenents:
#define pirPin 3//The PIR motion sensor
#define trigCamera 4//The camera's trigger


int photoNumber;

/*
* Functions:
*/
void photo(){//function for shooting pictures
// "Hold HIGH and trigger quick (<250ms) LOW to take a photo."
digitalWrite(trigCamera, LOW);
delay(50);
digitalWrite(trigCamera, HIGH);
}

void printDate (){
    DateTime now = rtc.now(); //define "now" as object containing the date produced by the RTC
    //the following instruction print the date on the SerialMonitor
    myFile.print("Photo n°");
    myFile.print(photoNumber);
    myFile.print(" : ");
    myFile.print(now.day(), DEC);
    myFile.print('/');
    myFile.print(now.month(), DEC);
    myFile.print('/');
    myFile.print(now.year(), DEC);
    myFile.print('/');
    myFile.print(now.hour(), DEC);
    myFile.print(':');
    myFile.print(now.minute(), DEC);
    myFile.print(':');
    myFile.print(now.second(), DEC);
    myFile.println();//skip a line
}

void setup() {
    //define pinMode:
    pinMode(pirPin, INPUT);
    pinMode(trigCamera, OUTPUT);
    digitalWrite(trigCamera, HIGH);

    //following line sets the RTC to the date & time this sketch was compiled
    rtc.begin(DateTime(F(__DATE__), F(__TIME__)));
    // This line sets the RTC with an explicit date & time, for example to set
    // January 21, 2014 at 3am you would call:
    // rtc.adjust(DateTime(2014, 1, 21, 3, 0, 0));

    photoNumber = 0;//initialization of the number of pictures

    if(!SD.begin(10)){
        while (1);
    }
}

void loop() {
    myFile = SD.open("TIMEDATA.txt", FILE_WRITE);//open the file "TIMEDATA" to write in it
    if(digitalRead(pirPin)){//if motion is detected:
        photo();//camera takes a photograph
        photoNumber++;//a new picture has been taken
        printDate();//write the date of shooting on SD card
        delay(1000);//pause between each photo
    }
    myFile.close();// close the file after editing
}
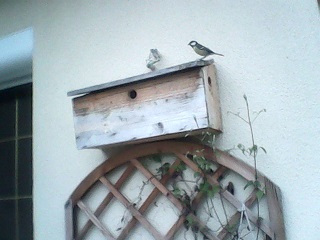
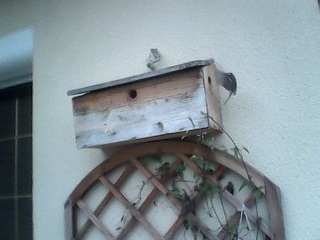
Results
I had the chance to have a family of great tit, that were in a birdhouse I made.
Here are two images taken by the Arduino Camera Trap.